Building a Simple Application with MapWinGIS
MapWinGIS is an ActiveX control that enables developers to integrate GIS functionalities into their Windows applications. It is part of the MapWindow GIS Project and has been around for several years. It is thus very stable with lots of users.
While the technical documentation for the control is available, documentation to help people get started who are new to programming is sparse. This project seeks to fill this gap by providing introductory tutorials and code for people to get started with the control. This is the first in a set of tutorials that will be forthcoming.
Building a Simple Map Viewer Application
Let’s illustrate how to use MapWinGIS by building a simple map viewer application. This application will allow us to view shapefiles using our own custom map viewer. I am using VB.Net for coding, but the codes can be easily converted to c#.
-
Start Visual Studio and Create a new project.
-
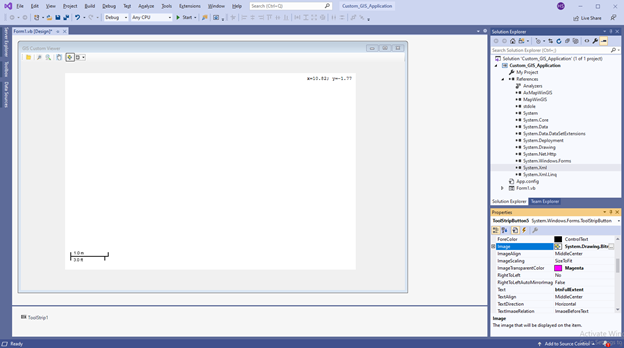
When the windows form appear as shown below, you are ready to start designing your custom application.

-
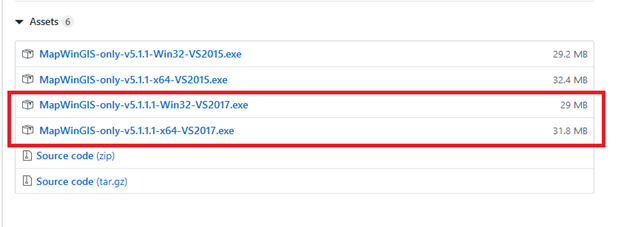
Visit MapWinGIS.ocx. Download the two files show in the illustration below. From my experience, if you just download the 64 bit file, the Control won’t appear in VB.Net. When both are downloaded and installed, everything works fine.
-
Now, you need to add the MapWinGIS ActiveX control to your Visual Basic toolbox. To do this, right click in the Toolbox area and select “Choose Items…” . This will cause the “Choose Toolbox Items” dialog box to display. </li>
-
When the “Choose Toolbox Items” dialog box displays, several files will be loaded. This may take a moment. Since MapWinGIS is a COM object, you need to click the “COM Components” tab. Note that this also can take a few minutes to load depending on the number of COM objects on your computer.
-
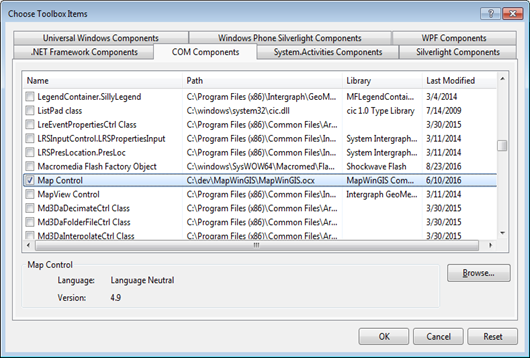
When the list of COM objects loads, scroll down the list to the “Map Control” component. Note that ESRI also has a component called “Map Control” that may also appear in your list of components. Make sure you select the MapWinGIS component. Click Ok.
-
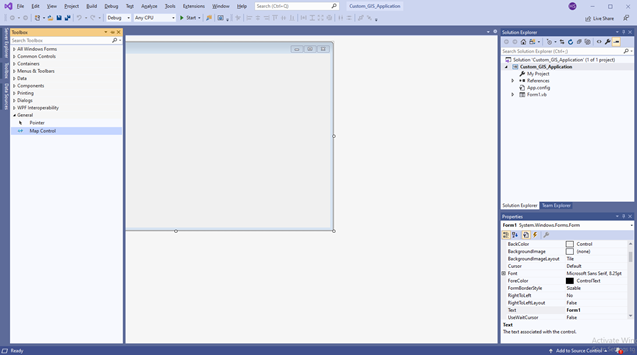
The MapWinGIS ActiveX control will appear in the Visual Basic Community Toolbox with the name, “Map Control”.
-
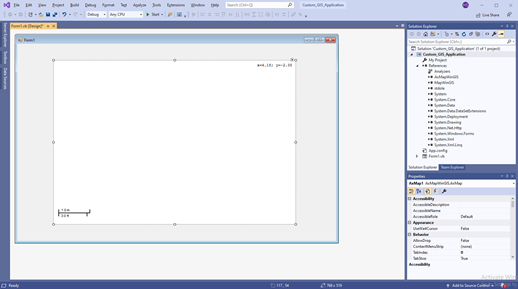
The next step is to add the Map Component to your Visual Basic Form. This process is very simple as it only involves selecting the “Map Control” from the toolbox and dragging it to the form. Once the map control is placed on the form, you can resize it and reposition it to meet your needs. In the illustration below, an instance of a map control was placed on the Form and resized.
-
Click on the Map Control to make it active. Notice that the “Properties” window of the Map Control appears to the right of the screen. Scroll down to Design (Name) and change the default name “AxMap1” to something you can remember easily, e.g., mapMain.
-
Now, click on the Windows form itself to make it active (not the control), and change the name of the form from Form1 to frmMain or whatever you want. If you do not want users to resize your form after you set its size, scroll down in the form properties and look for Appearance. Select FormBorderStyle and set it to FixedDialog.
-
Scroll further down further the form properties under Appearance and look for the Text section. Change the form Text to something you like, e.g., “GIS Custom Viewer”
-
Now, you will add a Toolstrip with five buttons to your application. One button will be used to load shapefiles into the application, while the other four will be used navigate the map, i.e., zoom in, zoom out, pan, and zoom to full extents. After adding the buttons, we will add the code to activate the buttons.
-
Go to the Toolbox to the left of the screen, scroll down to the “Menus and Toolbars” section and select “ToolStrip”. Click on the windows form (not the map control) and the ToolStrip will position itself across the top of the form. Note: If you change the Layout’s AutoSize property of the ToolStrip to false, you will be able to change its height and the ToolStripButton will change its height automatically to fit into the tool strip.
-
Click on the dropdown to the top left of the ToolStrip and select “Button”. A button will be added to the ToolStrip.
-
Click the dropdown again and this time select “Separator”. A separator or space will be added next to the button. Click button again and add another button. Repeat the process until you have added five buttons with appropriate spaces between them, as shown below.
-
Click on each button and the properties dialog associated with the button will appear to the right. Name your buttons: “btnAddShapefile”, “btnZoomIn,” “btnZoomOut,” “btnPan,” and “btnFullExtent”.
-
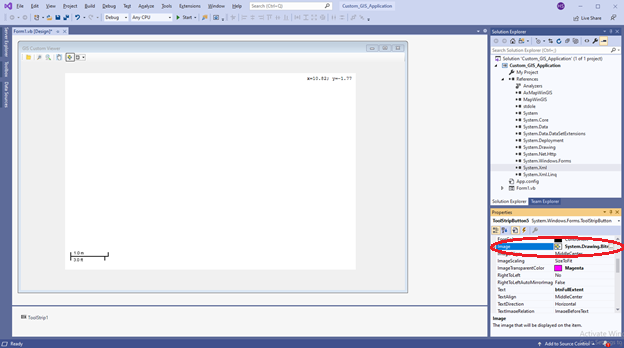
Now add an image to each button. Look on the internet for free icons for the different controls and save the images to a folder. For each button on the toolstrip, click on the button, then in the properties window, select Image. Click on “Systems.Drawing.Bitmap”. Follow the prompt and import the appropriate image for each button.
-
We will now add code to the map control to make it display shapefiles, and to each button to enable map navigation. To keep things simple, we assume that the shapefiles are stored in a file folder. For an enterprise GIS, the data are stored in a database software like Postgresql and the map viewer application must access the database to retrieve data.
-
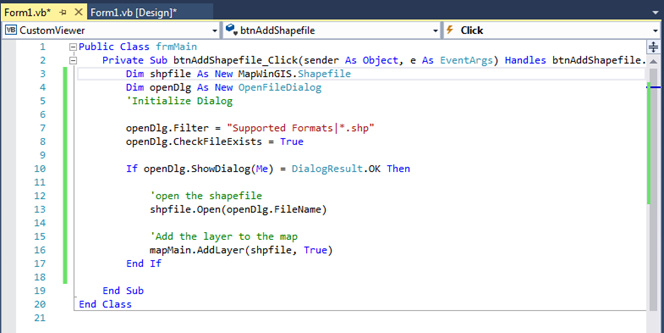
In the form view, double click on the first button in the Toolstrip, i.e., the Add Layer button, to view its code stub. Type the code below into the code stub.
Private Sub btnAddShapefile_Click(sender As Object, e As EventArgs) Handles btnAddShapefile.Click Dim shpfile As New MapWinGIS.Shapefile Dim openDlg As New OpenFileDialog 'Initialize Dialog openDlg.Filter = "Supported Formats|*.shp" openDlg.CheckFileExists = True If openDlg.ShowDialog() = DialogResult.OK Then 'Open the shapefile shpfile.Open(openDlg.FileName) 'Add the layer to the map mapMain.AddLayer(shpfile, True) End If End Sub -
The illustration below shows the code in VB.Net
-
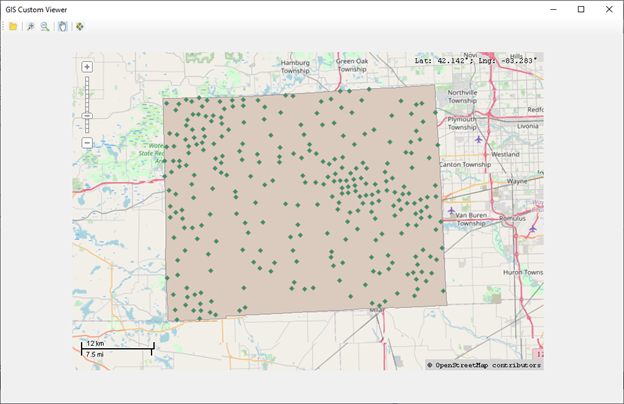
To see if your code works, click on the green play button on toolbar, or press F5. The application will build and then display a form with nothing in it. Click the add layer button and navigate to a shapefile on your computer and select it. It should appear in the application. In the illustration below, I added a Washtenaw County boundary layer and a landmarks layer to the application for viewing. By default, an OSM layer is added as a basemap. Click on the Stop Debugging icon to return to the coding environment.
-
Add Code to the Navigation Buttons. Add code to the subroutine stubs for each of the Click event for each of your buttons. Add only the code in blue to the to the wrapper for each button.
Private Sub btnZoomIn_Click(sender As Object, e As EventArgs) Handles btnZoomIn.Click. mapMain.CursorMode = MapWinGIS.tkCursorMode.cmZoomIn End Sub -
Add the code below to the zoom-out button.
Private Sub btnZoomOut_Click(sender As Object, e As EventArgs) Handles btnZoomOut.Click. mapMain.CursorMode = MapWinGIS.tkCursorMode.cmZoomOut End Sub -
Add the code below to the pan button.
Private Sub btnPan_Click(sender As Object, e As EventArgs) Handles btnPan.Click. mapMain.CursorMode = MapWinGIS.tkCursorMode.cmPan End Sub -
Add the code below to the full extent button
Private Sub btnFullExtent_Click(sender As Object, e As EventArgs) Handles btnFullExtent.Click. mapMain.ZoomToMaxExtents() End Sub -
The complete code blocks should appear as shown below. Save your project.
-
Now run the application. Mine looks as shown below.
Section 2. Displaying the Shapefile’s Attribute Table
-
In this section, we will write code to allow users to view the attribute table associated with each shapefile loaded into the viewing area. The development strategy is to create a new Windows Form and place a DataGridView object on it. The DataGridView will then be used to add data from attribute tables to the form. Note: the code for this section comes from Brian Marchionni’s Introduction to Custom GIS Application Development for Windows
-
Right click your project name in the Solution Explorer and select Add, then Class, then Windows Form. A new form will be added to the project.
-
Scroll to the bottom of the dialog and rename the form AttributeTable.vb. Click Add.
-
Click on Toolbox to the left edge of Visual Studio and look for Data then DataGridView. Visual Studio’s DataGridView control provides a very flexible way to display data in a tabular format. The data may come from various source. In this instance, we will use the DataGridView to view the contents of the attribute table of the shapefile.
-
Drag the DataGridView control to the center of the AttributeTable form. Click on the DataGridView control and select properties. When the properties window appears, look for Layout. Under Layout, look for the attribute named “Dock” and change it to “Fill”. You may have to select the large rectangle in the center.
-
Now return to the main form, Form1.vb [Design], to create a button that will be used to open the attribute table. Add a button to ToolStrip1 named “btnShowDataGrid”. Create an icon for this button, and change the Text attribute from ToolStripButton1 to “Show Attribute Table.
-
Now we will write code to establish communication between the main form and the attribute table form as well as opening the attribute table. Double click the btnShowDataGrid button to create an event handler for the button. Set up the Private Sub btnShowDataGrid_Click(…) sub as shown below.
Private Sub ToolStripButton8_Click(sender As Object, e As EventArgs)Handles BtnShowDataGrid.Click. 'Dim shpfile As New MapWinGIS.Shapefile Dim hndshpfile As Integer = MapMain.NumLayers - 1 ' Get the handle of the layer 'Pass the handle of the shapefile shpfile = MapMain.get_GetObject(hndshpfilee) Dim myTableForm As New FormTable(shpfile) myTableForm.ShowDialog() End Sub -
This code is part of the setup that allows communication between the main form and the attribute table form. Whenever the user clicks the Show Attribute Table button, the a reference to the current shapefile is obtained. Secondly, a new instance of the AttributeTable form will be created and then displayed with the shapefile’s information that was passed to it.
-
Return to the AttributeTable form by right clicking on AttributeTable.vb in the Solution Explorer and selecting View Code from the drop down menu. We will now write code so that the attribute table can receive information from the main form whenever it is called. Declare a class variable called pshapeFile of type MapWinGIS.Shapefile. Write the code as follows:
Dim pShapeFile As MapWinGIS.Shapefile -
Create a new Subroutine called New(…) with parameters ByRef myShapeFile As MapWinGIS.Shapefile. Create the subroutine by copying the entire code below including the wrapper and pasting it below the Class declaration you made in the last section. A line will appear separating the two codes.
Public Sub New(ByRef myShapeFile As MapWinGIS.Shapefile) pShapeFile = myShapeFile InitializeComponent() End Sub -
The variable passed to this subroutine will is myShapeFile and will be assigned to the varibale pShapefile. The InitializeComponent method will build and initialize the form that will hold new instances of the attribute table. See this link for more information on InitializeComponent
-
Now, we will write code to display the attribute data of the shapefile that was passed to the new attribute table form. Double click on the title bar of the AttributeTable form to open the code stub for the AttributeTable_Load(…) event. Add the following lines to the AttributeTable Load event.
Public Sub New(ByRef myShapeFile As MapWinGIS.Shapefile) pShapeFile = myShapeFile InitializeComponent() End Sub -
At the very too of the page before the public declarations add the following code.
Imports System Imports System.IO Imports System.Windows.Forms Imports AxMapWinGIS Imports MapWinGIS -
Add the following under public
Public Class AttributeTable Dim pMyShapeFile As MapWinGIS.Shapefile Dim MyDataRow As DataRow Dim MyDataTable As New DataTable Dim dlg As New frmMain Private Sub FormTable_Load(sender As Object, e As EventArgs) Handles MyBase.Load For i As Integer = 0 To pMyShapeFile.NumFields - 1 MyDataTable.Columns.Add(pShapeFile.Field(i).Name) Next i For j As Integer = 0 To pMyShapeFile.NumShapes - 1 MyDataRow = MyDataTable.NewRow For k As Integer = 0 To pMyShapeFile.NumFields - 1 MyDataRow(k) = pShapeFile.CellValue(k, j) Next k MyDataTable.Rows.Add(MyDataRow) Next 'Link the datagrid view to the temporary data source tabble DataGridView1.DataSource = MyDataTable End Sub End Class -
The first two lines in the code above will create a temporary datatable and datarow. These will be populated with data from the shapefiles attribute table. Column is an attribute of myDataTable. The “For i …” code block will loop through the column names found in the shapefile’s attribute and add them to the myDataTable columns.
-
The “For .. j” code block will get the number of shapes in the shapefile’s variable (pShapeFile) then loop through each shape to create new rows. Then, for each field, the For k code block will add the cell values for the appropriate row/field position. Finally the temporary row is added to the myDataTable variable. The DataGridView1.DataSource line sets the data source to be equal to myDataTable.
-
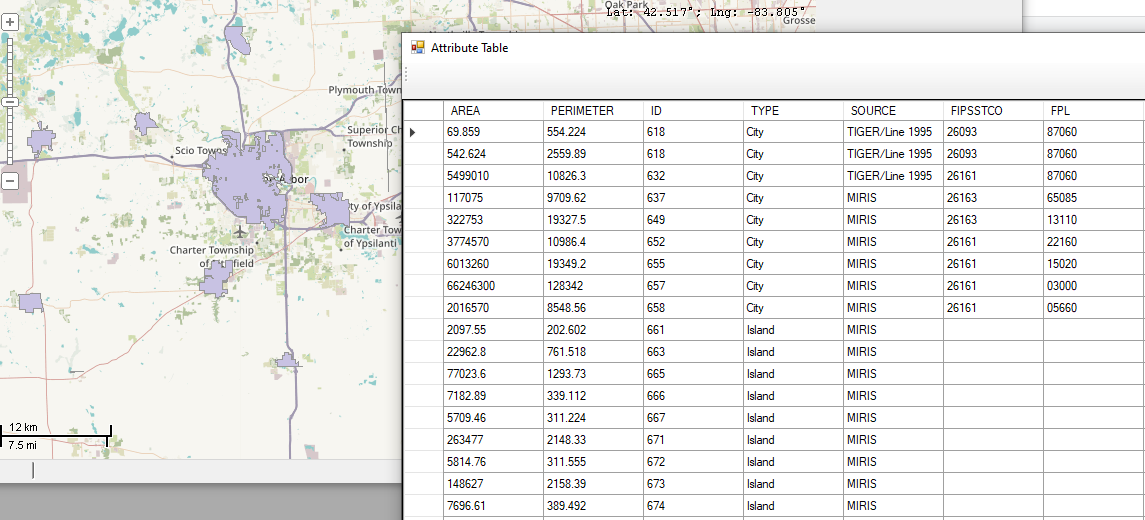
Run your program then load a shapefile. Click the Show Data Grid button. The attribute table should display, as shown below.
-
That’s it. In the next section, we illustrate how to compile your application so that it could be distributed to end users.
Section 3. Compiling Your Application
The details of compiling your application can be found on many websites. Below, I provide an overview of the process using information found at this link.
-
Quit running the program and return to the development environment. Click on Project then Properties to access the properties of your application.
-
When the properties dialog opens, it should appear as shown below.
-
In the properties dialog, you can make a variety of changes. For example, Assembly name controls the name that appears on the .exe that you will create. You can Leave the existing name.
-
Click on “Publish”, then Prerequisites
-
In the Prerequites dialog, ensure that the .Net Frameworks shown in the illustration below are checked. Files for the assembly will be delivered with your application. Also, place a check in front of Windows Installer so that your application will have a setup file to install it on user computers. Click Ok
-
From the Publish tab, click on Options and fill in the dialog under description. Enter your name and the product name.
-
In the Publish options, under Manifests, put a check in front of “Create desktop shortcut”.
-
In the Publish options, click on Publish Wizard and select a location where you want the .exe and associated files to be placed.
-
Click on Next and accept defaults. Visual Studio will create the exe files and all associated files necessary to install your program on another computer. You can copy the folder and its contents, put it on another computer and run the setup file to install it.
-
That’s it. You have just built your first standalone custom GIS application.