ArcPy
What is ArcPy
ArcPy is a commercial GIS library created by ESRI for use by its software ArcMap and ArcGIS Pro. It provides access to all the tools in ArcToolbox. Tools are accessed as functions using the following syntax :
“arcpy[toolname_toolboxalias][parameters]”
Information on tool names and tool parameters can be obtained from ArcPy’s documentation. Note that the tool names often vary a bit from their names in Toolbox. Below, are examples of ArcPy scripts for executing terrain analysis tools.
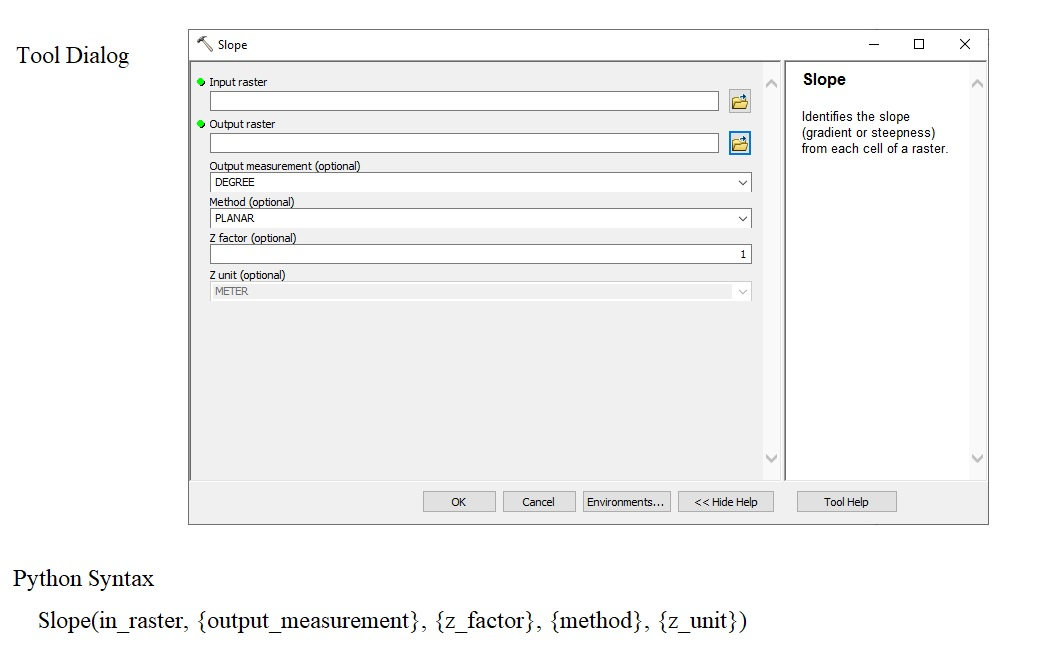
Typically tools are accessed through dialog box, as shown in the illustration below. However, arcpy accesses the tool throuh code. In addition, ArcPy can be used to create user defined tools and dialogs.
Script Samples
Arcpy Mapping Module
- Using the Arcpy Mapping Module to Manage Projects, Maps, and Layers
- Managing Layouts with the Arcpy Mapping Module
- Automating Map Production and Printing
- Updating and Fixing Data Sources
Terrain Analysis with ArcPy
Calculate Slope using Python’s Window within ArcMap
import arcpy
from arcpy import env
from arcpy.sa import *
env.workspace = "C:/Washtenaw/county/washtenaw/topography" # Set your own path
outSlope = Slope("dem", "DEGREE", 0.3043)  # Slope Tool
outSlope.save("C:/.../outslope01")
Calculate Slope from IDLE or Jupyter
   # Import system modules
   import arcpy
   from arcpy import env
   from arcpy.sa import *

   # Set environment settings
   env.workspace = "C:/Washtenaw"

   # Set local variables
   inRaster = "C:/Washtenaw/.../topography/dem"
   outMeasurement = "DEGREE"
   zFactor = 0.3043

   # Check out the ArcGIS Spatial Analyst extension license
   arcpy.CheckOutExtension("Spatial")

   # Execute Slope
   outSlope = Slope(inRaster, outMeasurement, zFactor) # Slope Tool

   # Save the output
   outSlope.save("C:/Washtenaw/county/outslope02")
Aspect
# Import system modules
import arcpy
from arcpy import env
from arcpy.sa import *

# Set environment settings
env.workspace = "C:/sapyexamples/data"

# Set local variables
inRaster = "elevation"

# Execute Aspect
outAspect = Aspect(inRaster)  # Aspect tool

# Save the output
outAspect.save("C:/sapyexamples/outaspect02")
Script to Derive Hillshade
# Import system modules
import arcpy
from arcpy import env
from arcpy.sa import *

# Set environment settings
env.workspace = "C:/sapyexamples/data"

# Set local variables
inRaster = "elevation"
azimuth = 180
altitude = 75
modelShadows = "SHADOWS"
zFactor = 0.348

# Check out the ArcGIS Spatial Analyst extension license
arcpy.CheckOutExtension("Spatial")

# Execute HillShade
outHillShade = Hillshade(inRaster, azimuth, altitude, modelShadows, zFactor)

# Save the output
outHillShade.save("C:/sapyexamples/output/outhillshd02")
Integrating Multiple Tools into a Single Script to Automate Workflows
Calculate Slope and Aspect Using a Single Script
#Import system modules
import arcpy
from arcpy import env
from arcpy.sa import *

try:
    # Set environment settings
    env.workspace = "C:/workspace"
    # Set local variables
    inRaster = "dem"
    outMeasurement = "DEGREE"
    zFactor = 0.3043

    # Check out the ArcGIS Spatial Analyst extension license
    arcpy.CheckOutExtension("Spatial")

    # Execute Slope
    outSlope = Slope(inRaster, outMeasurement, zFactor)

    # Save the output
    outSlope.save("C:/workspace/outslope02")
    print "Slope successfully calculated"
    # Execute Aspect
    outAspect = Aspect(inRaster)

except Exception as e:
    print (e.message)
E#### xtract DEMs for each of Michigan’s 83 Counties from a Single State-wide DEM
import arcpy
from arcpy.sa import *
arcpy.env.workspace = 'C:/Users/.../DEMs'
arcpy.env.overwriteOutput = True
cursor = arcpy.SearchCursor('Michigan.shp')
for row in cursor:
    county = row.Shape
    arcpy.gp.ExtractByMask_sa('dem', county, str(row.getValue('NAME')) )
    print (str(row.getValue('NAME')))
Calculate Slope for all Counties in Michigan
import arcpy
from arcpy.sa import *
arcpy.env.workspace = 'C:/Users/.../DEMs'
arcpy.env.overwriteOutput = True
rasterlist = arcpy.ListRasters() # Get a list of input rasters

for raster in rasterlist:
    arcpy.Slope_3d(raster, "s_" + str(raster), "DEGREE", 1)
    print ("s_" + str(raster))
Watershed Delineation
# Import system modules
import arcpy
from arcpy import env
from arcpy.sa import *
try:
    # Set environment settings
    env.workspace = "C:/Users/.../Stowe_Watersheds"
    env.overwriteOutput = True


    # Check out ArcGIS Spatial Analyst extension
    arcpy.CheckOutExtension("Spatial")

    # Fill sink
    outFill = Fill("elevation")
    outFill.save("fill01")

    #Flow Direction
    outFlowDirection = FlowDirection("fill01", "NORMAL")
    outFlowDirection.save("flowdir")


    # Flow Accumulation
    outFlowAccumulation = FlowAccumulation("flowdir")
    outFlowAccumulation.save("flowAccum")

    # Define stream length
    streams = Con(Raster("flowAccum") > 1500, 1)
    streams.save("streams")

    # Stream Link
    outStreamLink = StreamLink("streams", "flowdir")
    outStreamLink.save("outStreamLink")

    # Stream to Feature
    outStreamFeat = StreamToFeature("streams", "flowdir", "outstrm01.shp", "NO_SIMPLIFY")


    #Delineate Watershed
    PourPoint = "PourPoint.shp"
    outWatershed = Watershed("flowdir", PourPoint, "Id")
    outWatershed.save("watershed")#Delineate Watershed


    print ("Watershed successfully delineated")
except Exception as e:
    print (e)
Calculate Viewshed
This example determines the surface locations visible to a set of observers defined in a shapefile.
# Name: Viewshed_3d_Ex_02.py
# Description: Determines the raster surface locations visible to a set of
#              observer features.
# Requirements: 3D Analyst Extension

# Import system modules
import arcpy
from arcpy import env

# Set environment settings
env.workspace = "C:/data"

# Set local variables
inRaster = "elevation"
inObserverFeatures = "observers.shp"
outViewshed = "C:/output/outvwshd02"
zFactor = 2
useEarthCurvature = "CURVED_EARTH"
refractivityCoefficient = 0.15

# Check out the ArcGIS 3D Analyst extension license
arcpy.CheckOutExtension("3D")

# Execute Viewshed
arcpy.Viewshed_3d(inRaster, inObserverFeatures, outViewshed, zFactor,
            useEarthCurvature, refractivityCoefficient)
*** ArcPy Books ArcPy. Introduction to Geeprocessing Scripts